
Sports Performance Assessments
- Aug 7, 2023
- 19 min read
Each sport requires a specific combination of fitness and performance qualities. Many sports (e.g., football, basketball, or soccer), require a combination of strength, speed, agility (the ability to move quickly and easily), and endurance. But a coach might consider an athlete such as a shot-putter, powerlifter (an athlete who competes in a lifting event (bench press, squat, or dead lift) where the athlete has three attepmts to lift maximal weight) or Olympic lifter (an athlete who competes in events testing one attempt at a barbell plate-loaded movement like the clean and jerk)—there would be little value in taking them through an extended endurance test (such as a 30-minute jog) unless prescribed by a health professional.
Understanding which performance assessments will most benefit an athlete means a coach must first understand the general fitness requirements and the specific skill sets needed for each sport. For each sport, a coach must answer this series of questions:
Does the sport require intermittent or steady effort throughout?
Does it require rapid changes in speed or direction?
Which energy system do the players primarily use—aerobic or anaerobic (or both)?
What equipment do players wear (if any), and does it affect movement?
Does the sport require body contact between players?
Once a coach knows these details, they can establish and deliver an assessment protocol.

The first step should always be a health questionnaire like the PAR-Q and health history. Next, a coach should record resting heart rate and blood pressure as well as body composition and circumference measurements, if appropriate. The coach can then assess static and dynamic postures, including movement assessments. These will help illustrate any potential muscular imbalances that may affect an athlete’s movement patterns during training. Ideally, a coach should test flexibility, muscular endurance, and cardiorespiratory fitness before training or activity or as a stand-alone session to avoid fatigue. For the same reason, if balance is tested, it should be done before training.
These more basic assessments should all precede assessments for speed, strength, agility, quickness, and power. Performance assessments allow a coach to accurately determine an athlete’s existing strengths as well as areas of opportunity for training. These assessments, of which there are many, cover strength testing, maximal strength testing, explosive strength testing, endurance testing, and agility testing.
Strength
Strength is the ability to exert muscular force (an action capable of changin the motin of an object) under a given condition. Strength is built and maintained to support functional movement, body composition, strong bones, and ideal posture. Athletes translate strength into athletic performance improvements by using bilateral movement, eccentric training and loading, and variable resistance training. An athlete who already exhibits considerable strength will benefit from power and reactive strength training protocols while still maintaining and improving their strength.
Maximal Strength
This specific type of strength requires maximum activation of the largest motor units, which can typically sustain their activity for only 5 to 10 consecutive seconds. Maximal strength (the maximum amount of force a muscle can produce) is a measure of an athlete’s peak voluntary muscular force. Training with maximal loads requires high levels of synaptic input to the motor neuron pool, which recruits the high-threshold motor units that produce the most force.
Lifting heavy loads strengthens the muscles, tendons, and bones, which are then capable of transferring more power ( the maximal amount of force and velocity that can be produced by the nueromuscular system at a given load) to any sport or activity. An athlete cannot develop high levels of power unless they have sufficient maximal strength.
Developing maximal strength can help athletes increase their endurance for high-intensity activities. For example, improving an athlete’s one-repetition maximum (1RM) (the maximum load an athlete can lift for one repetition) in the bench press from 270 to 315 pounds will allow them to perform more reps with 225 pounds, allowing for an increase in muscular work capacity (the maximum amount of exercise an athlete can recover from to elicit a positive adaptation) and rate of force production. Research suggests athletes who regularly train for maximal strength can increase their aerobic capacity in the way of delayed fatigue by 18 to 31 percent. Not only does a 1RM test result give a coach a better understanding of an athlete’s current strength, but this subjective metric allows a coach to challenge the athlete with appropriate intensities and loads during a training cycle.
Did You Know
How much maximal strength is enough? An athlete’s maximal strength is a major component of their overall fitness, but not every athlete needs more. The journey toward greater and greater maximal strength can come at a very high physical cost for athletes because it can put undue strain on their joints, cause neural fatigue, and possibly expose them to unnecessary injury risks.
How To Test Maximal Strength
When determining an athlete’s initial level of maximal strength, a coach should take care to keep the athlete within their physical capabilities while still attempting to challenge their capacity. A coach must insist on ideal form and posture during maximal strength testing to prevent injury. The Borg CR10 scale (A scale that ranges from 1 to 10 and is used to quantify a person’s perception of intensity during an activity), which measures the athlete’s rate of perceived exertion (RPE) on an analogue scale, is used to identify the difficulty of the effort. This 10-point scale is a valuable tool for determining how hard the athlete feels they are working. A rating of 1 should equate to complete rest and relaxation, while a rating of 10 is all-out maximum effort.
Did You Know
When testing an athlete’s maximal strength, it’s important to not provide psychological stimulation? Cheering for the athlete or encouraging them to lift loads beyond their capability urges them to employ the psychology of willpower, which is not what is being tested. To get the most accurate result, a performance assessment should measure what the athlete is capable of lifting without extra stimulation.
One-Repetition Maximum (1RM)
Knowing an athlete’s 1RM for various lifts is beneficial for two reasons:
1RM helps to determine how much load will appropriately challenge the athlete.
1RM is a subjective assessment that can be repeated to track gains in strength throughout a training macrocycle.
A 1RM test can be high risk, time consuming, and exhausting to the athlete. To be accurate, it requires them to reach an RPE of 10. Exercises that require minimal skill (the ability to do a task well) are ideal for 1RM testing. A coach must avoid 1RM testing for complex lifts such as Olympic lifts or exercises that put excessive strain on the spine, such as a dead lift or a standing overhead press. Bench press, squats, leg press, and lat pull-downs are better used as benchmark movements in maximal strength testing. The exception would be if an athlete is advanced and has previously used such a movement as a benchmark.
Before an athlete makes any 1RM attempt, they should do three warm-up sets of two reps each, with progressively heavier loads. Deconditioned athletes should have a trial round of the selected movement with 15 repetitions at a self-selected weight and then wait 48 hours before a testing session so they can become familiar with the movement and the protocol.
Set one should be a moderate load with an RPE of four to five followed by two minutes of rest. Set two should increase the resistance to an RPE of six to seven followed by a three-minute rest. Set three, the final warm-up set, should increase the effort to an RPE of approximately eight followed by a five-minute rest.
Set four is the 1RM test itself. It should use a load approximately 20 percent greater than that used in the third warm-up set. The coach should emphasize the utmost importance of proper movement mechanics and form as the athlete completes the repetition. Once the single repetition is completed, the athlete should rest for up to five minutes before continuing training.

The table represents the minimum number of steps to test an athlete’s 1RM. Each of the three warm-up sets should be performed with progressively heavier loads that correspond with the proper RPE. Use as many warm-up sets as necessary, ending with an RPE around eight. The first 1RM attempt starts with a load that’s approximately 20 percent greater than the last warm-up set. If additional 1RM attempts are necessary, rest at least five minutes between each attempt.
Two to Three-Repetition Max (2-3RM)
When a 1RM test is not possible or unadvisable for a particular athlete, another option is a 2–3RM test. It relies on a range of reps, which increases the chances of finding the right load in less time. It also uses a lower total load for those concerned about (or who are prone to) injury. The range of two to three repetitions will also provide a weight range useful for calculating a 1RM.
There is much debate in athletics about the relative merits of the 1RM, 2–3RM, and even 5RM tests. The conversation centers around the stress placed on the body when lifting one repetition of maximal weight versus the stress from lifting 90 to 98 percent of maximal weight multiple times, where the total work is considered greater. Research suggests when the 1RM itself is not used, 3–5RM is the most accurate range of repetitions a coach or athlete can use to calculate a true 1RM.
The athlete should follow the same warm-up protocol as the 1RM before the maximal-effort attempt. Before the first 2–3RM attempt, a coach should instruct the athlete to stop at three reps, regardless of their RPE or if they feel they can successfully complete more. If the athlete could have completed more than two or three repetitions, the load was not heavy enough and should be increased for another attempt. If multiple attempts are to be made, adequate rests (three to five minutes) should be allowed between attempts to prevent fatigue. The increases in weight for each additional round range from 5 to 10 percent. The assumptions leading to an estimation of the 1RM are these:
If an athlete can complete two reps, they’re using 90–92.5 percent of their 1RM.
If an athlete can complete three reps, they’re using 87.5–90 percent of their 1RM.
A coach can then divide the load by the percentage to find the 1RM. For example, if the athlete maxed out at three reps with 150 pounds, their 1RM for that lift is 167 to 171 pounds. The math looks like this:
150 pounds / 0.875 = 171 pounds
150 pounds / 0.90 = 167 pounds
Calculating the range for this slightly submaximal test delivers a reliable and relatively small weight range to apply as the metric. In this example, the difference is four pounds with the general assumption that 171 pounds is the true 1RM for this athlete.
The 1RM for an exercise can also be calculated with the Brzycki equation:
1RM = W x 36 / (37 – R)
In this equation, W is weight used, and R is the number of repetitions completed with weight W.
Steps For Testing 2-3RM
The first 2–3RM attempt starts with a load approximately 15 percent higher than the final warm-up set. If additional 2–3RM attempts are necessary, the athlete should rest at least five minutes between each attempt.

Assessing Full-body Strength
The physical capabilities of male athletes and female athletes are inherently different. In general, men and women have similar levels of relative strength (how strong an athlete is in relation to their body weight) in the legs, but women typically have less relative strength in the upper body.
Relative and Absolute Strength
This strength quality is especially important for athletes who compete in sports with weight classes because then the goal of relative strength training is to improve an athlete's strength with little or no increase in body weight. Absolute strength (the maximum amount of force a person can exert, regardless of body weight) removes the consideration of body weight to determine the maximum force an athlete can exert regardless of weight.
Strength assessments are designed to determine the current state of an athlete’s abilities with the aim of improving not only the assessment outcomes but also the full-body power an athlete is able to produce functionally for their sport. Strength assessments for each type of athlete should correspond to the demands of their sport, as should the types of cyclical training prescribed in the various training cycles to promote strength gains, recovery, and movement efficiency.
Explosive Strength
The ability to express maximum force in minimal time is explosive strength. Force is measured in newtons, and one newton (N) (the force required to accelerate one kilogram of mass at one meter per second squared in the direction the force is applied) is the force required to accelerate one kilogram of mass at one meter per second squared in the direction the force is applied:
1N = 1 kg x m/s2
Here is another way to write that same equation: F = m x a
In this version of the equation, F stands for force, m stands for mass, and a stands for acceleration (force is mass multiplied by acceleration).
The rate at which an athlete can develop force with rapid voluntary contraction is the rate of force development (RFD). An athlete builds explosive strength by increasing the RFD of the prime mover, which then allows them to be more explosive in less time. Research also suggests that heavy resistance strength training can also increase the RFD by increasing muscle contractility and neural drive (in the form of motor neuron outflow). Because RFD is measured in newtons per second (force and time), the relationship between explosive strength and RFD can be illustrated with a force-time curve.

Left: Both athletes achieve the same level of force, but athlete B produces more force at all times before the peak. Right: Athlete B produces a higher level of force and then returns to a resting state faster than athlete A. In either case, athlete B has a higher RFD and more explosive strength than athlete A.
Speed strength is the ability of the neuromuscular system to create the largest impulse in the shortest amount of time—that is, it’s the ability to move at high speed with maximum load such as an Olympic lift, shot put, or hammer throw.
This equation calculates speed strength: SS = W/T
SS is speed strength, W is work, and T is time (power is work divided by time), and work is defined as force times distance. That means that a refinement of the above equation would look like this: SS = (F x D) / T
The equation shows there are three ways to increase speed strength:
Produce more force in the same amount of time
Produce the same amount of force in less time
Produce more force in less time
How To Test Explosive Strength
Three widely applicable and concise performance assessments are the vertical jump, the standing broad jump, and the single-leg broad jump. The vertical jump applies to any athlete who jumps in their sport, while the standing and single-leg broad jumps apply to any athlete who cuts, stops, and starts and uses full-body explosive movements.
Important Tips For Testing Explosive Strength
The athlete should refrain from any heavy weight training for two days before testing to ensure they are physically recovered.
All possible variables (testing time, testing location, warm-up activity, testing equipment, testing procedure, and so on) must be kept consistent through subsequent trials, or the data will be skewed.
The biomechanics of the jump must be as consistent as possible. In subsequent trials, if the athlete uses a wider or narrower foot placement or is wearing different shoes or jumping from a different surface, an accurate measure of performance changes cannot be achieved.
Proper warm-up is essential. Warm-ups should prepare the nervous system and joints for activity. Maximal effort should not be attempted until the actual test.
Vertical Jump
The athlete should perform two vertical jumps with 60 seconds of rest between each as part of a warm-up and to familiarize themselves with the testing protocol. Then the athlete should stand with both feet firmly on the floor and reach the highest possible point on the measuring device to determine their baseline reach.
When the athlete is ready to perform the jump, the coach should measure the distance between the inside of their heels and place two tape marks on the floor so their heels maintain the exact same width with each subsequent attempt. Whichever foot placement feels most natural to the athlete is appropriate for this test. That stance width will be slightly different for everyone.
After completing the warm-up attempts and establishing baselines, the athlete is ready to perform a maximum vertical jump test, using as much arm swing as feels natural. They should perform three attempts with 90 seconds of rest between each. The coach should record the highest point reached—that is, the largest difference between the baseline reach and the maximum vertical jump touch.
Standing Broad Jump
The primary difference between the vertical jump test and the standing long jump test is that the latter challenges balance, which is necessary for sticking the landing. For explosive athletes who require dynamic balance and strength in combination, this performance assessment is very effective.
The athlete should perform three warm-up standing broad jumps with 60 seconds of rest between each to familiarize themselves with the test protocol. Ideally, the assessment will occur on a firm, dry, flat surface such as a hardwood floor or a track surface. The location of the test should be noted for future retesting consistency. The athlete can perform the standing broad jump without shoes or wearing any shoe with minimal cushioning. Athletes should avoid wearing shoes with thick cushioned soles.
When the athlete is ready to perform a broad jump, the coach should measure the distance between the inside of their heels and place two tape marks on the floor so the athlete’s heels are the exact same width with each subsequent attempt. Like the vertical jump, whichever foot placement feels most natural to the athlete is appropriate for this test.
The athlete should then make three standing broad jumps with 90 seconds of rest between each attempt. If the athlete loses balance on the landing, the attempt does not count.
The score is the measurement in inches from toes at takeoff to the back of the heels at landing. If the feet are not even, the measurement should stop at the heel closer to the takeoff line. The assessment records the longest of the three jumps.
Single-leg Long Jump
To familiarize themselves with the test protocol, the athlete should perform three warm-up single-leg long jumps on their desired (typically dominant) leg, with 60 seconds of rest between each trial. As they initiate the jump with an arm swing, they must be fully loaded on a single leg, and they must land on the same single leg. Ideally the assessment will occur on a firm, dry, flat surface such as a hardwood floor or a track surface. The location of the test should be noted for future retesting consistency. The athlete can test the standing long jump without shoes or while wearing any shoe with minimal cushioning. A coach should avoid testing athletes who are wearing shoes with thick cushioned soles.
When the athlete is ready to perform the single-leg long jump assessment, the coach should mark the ground at the toe of the jumping foot so they can locate the same starting point with each subsequent attempt.
The athlete should then perform three single-leg long jumps with 90 seconds of rest between each attempt. If the athlete loses balance on the landing, the attempt does not count.
The score is the measurement in inches from the line (front of toes) at takeoff to the back of the heel at landing. The assessment score is the length of the longest jump.
From standing, the athlete quickly crouches into a single-leg loaded position and then immediately performs the longest jump possible while sticking the landing on one foot. Any extra step or loss of balance on the landing means the jump cannot count as an attempt.
Reactive Strength
When an athlete sprints, jumps, or cuts, their muscles must quickly stretch and then shorten. This stretch-shortening cycle (SSC) (an eccentric action followed immediately by a concentric action within the same muscle) is a key component of agility, acceleration, and speed. Training an athlete’s SSC is often termed plyometrics (a style of athletic training primarily addressing the stretch-shortening cycle.
The more quickly an athlete can transition between eccentric and concentric muscle actions, the faster they can react. This is the performance quality known as reactive strength (a person's ability to quickly transition between eccentric and concentric muscle actions). Research demonstrates that reactive strength is related to an athlete’s acceleration, cutting, and agility.
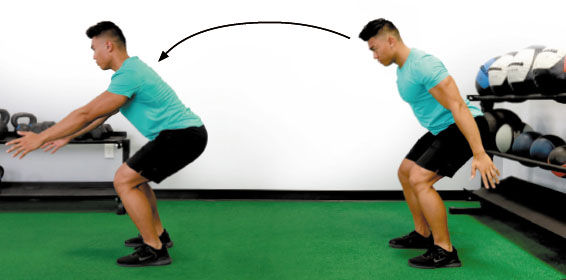
Reactive strength is measured by evaluating jump height relative to the contact time on the ground. The movement most often used to assess reactive strength is the depth jump as it is the only plyometric exercise with measurable ground contact time. This assessment is useful for athletes involved in any sport that requires rapid acceleration or changes of direction and agility (football, soccer, basketball, volleyball, and so on).

To perform a depth jump, the coach needs a box 12 to 18 inches in height and a tool to measure the height reached, such as a Vertec vertical jump tester. Starting atop the box, the athlete should step off the edge of the box, landing on both feet. As soon as their feet touch the floor, they should immediately jump straight into the air as if the ground were too hot, reaching as high as possible. The maximum height reached is their score for this assessment.
Before testing, two to three submaximal attempts punctuated by 60-second rests can serve both as a warm-up and to familiarize the athlete with the protocol. The athlete should also stand with both feet firmly on the floor and reach the highest possible point on the measuring device to determine their baseline reach.
The score for the depth jump assessment is the difference between the athlete’s standing reach and rebounding reach.
Strength Endurance
Endurance is the ability to sustain a submaximal level of performance. In most cases, strength endurance (the muscular ability to produce force over extended periods of time) is measured with loads between 50 and 60 percent of an athlete’s 1RM. Strength endurance is different from “endurance,” a term associated with the ability to sustain lower-intensity cardiorespiratory activities such as jogging or cycling.
Strength endurance is the ability to endure the repetitive nature of sport, to maintain strength, speed, and power at the highest and most consistent level throughout a competition or game. Training for strength endurance allows an athlete to:
Perform more volume of repetitions with a submaximal load,
Sustain a greater percentage of maximum force for an extended period, and
Metabolically recover faster between bouts of intense exercise.
The push-up test and pull-up test can be employed as relative strength tests for athletes and are sometimes placed in the category of muscle power or endurance testing. These performance assessments are ideal for testing the muscular endurance of the upper body—specifically the pushing and pulling of muscles.
A commonly employed lower-body strength endurance assessment is the goblet squat. The athlete will place their feet at hip width and clasp their hands in front of the chest just below the chin. The coach will be observing for proper squat form (back flat, proper hip hinge) as the athlete completes the repetitions. Only repetitions where the athlete brings the elbows to the medial side of the knees will count.
There are three common ways these strength endurance assessments can be administered:
The athlete completes repetitions until failure, and the coach counts the number of full repetitions completed with ideal form.
The athlete completes as many ideal repetitions as possible within a set amount of time (typically one or two minutes).
The athlete completes repetitions until failure in time to a rhythmic beep that creates a tempo (generally 20–25 beats per minute).
The use of beep testing is more common in professional and high-level athletics than in lower-level competition. The type of timing should be recorded so it can be replicated during future tests. The athlete’s score for all versions of this test is one point for each repetition completed with ideal form.
Some research suggests that these tests are valid when a coach considers that they are weight-relative tests of muscular strength (relative strength) and that athletes with less strength or ability may achieve a score of zero. Modifications can be made to upper-body assessments for athletes who require them.
A lack of strength endurance is a primary cause of fatigue during athletic competition. However, strength endurance is not as applicable when the sport requires actions lasting less than 10 seconds and when there’s an extended rest period between attempts, such as in Olympic lifting or throwing field events.
Speed And Agility
Agility, the ability to move quickly and easily, is one of the most important performance qualities for athletes competing in sports that require many rapid changes in direction, such as soccer, basketball, football, and volleyball. Adequate agility is also important for protecting an athlete from acute injury. Speed is the rate at which someone (or something) is able to move and is assessed alongside agility for most athletes.
Shuttle Runs
Shuttle runs are often referred to as sprints, and they are used as performance assessments for acceleration, speed, and athletic performance. Depending on the demands of the particular athlete’s sport, a coach can assess shuttle runs of any distance they choose. For athletes who play on courts, shuttle runs could usefully take into account all or part of the length of their playing surface. For example, a shuttle run for a volleyball player might be from the end line to the net and back, while a shuttle run for a basketball player might be the distance from the baseline to the free throw line on the opposite side of the court.
For all shuttle run tests, an additional timekeeper or two can prove very helpful. For shuttles in one direction, it is useful to have a person with a stopwatch at the end point of the effort. For assessments requiring the athlete to return to the starting point, having a timekeeper at the point where the athlete turns around allows a coach to capture more data (time to the turn and time to change direction, accelerate, and finish).
Shuttle runs can be modified to assess acceleration and maximum sprint speeds with the addition of cones along the distance of the shuttle. For example, for a 30-meter shuttle, a cone and an additional timekeeper can be added at 10 meters. The timekeeper at the first cone will stop their stopwatch as the athlete crosses their location to capture acceleration time, while the timekeeper at the end point captures time to reach maximum speed.
Lower Extremity Functional Test
The lower-extremity functional test (LEFT) (a drill to measure lateral speed and agility in both healthy and recovering athletes) is a functional agility test used as a performance assessment for healthy athletes and as a return-to-play assessment for athletes recovering from a lower-extremity injury. This assessment incorporates several footwork variations like the carioca (an agile crossover step where the leading foot step across and behind the other and the lagging foot follows through) step, forward and backward movement, and lateral movement.
To prepare for the LEFT test, a coach should set up two cones approximately 10 yards apart. The distance between the cones matters as it allows the athlete to accelerate to challenging speeds without demanding exertion that might prevent them from completing the assessment. The athlete will move between the cones in the following sequence:
Start at cone one.
A. Sprint to cone two and touch.
B. Backpedal to cone one and touch.
C. Side shuffle to cone two and touch.
D. Side shuffle to cone one and touch.
E. Carioca to cone two and touch.
F. Carioca to cone one and touch.
G. Forward sprint to and past cone two to finish.
The stopwatch begins with the initial movement and ends when the athlete passes cone two on the final forward sprint.
Cone Drills
A simple four-cone assessment allows a coach to capture an athlete’s ability to change direction and move laterally. Useful for assessing movements demanded by basketball, volleyball, and other court sports, the four-cone drill has an athlete start at one corner of a four-cone square. When they are moving to a cone to the left or right, they shuffle laterally. When they are moving to a cone in front or behind, they sprint or backpedal. The simplest movement pattern is to trace a square in one direction and then retrace the square to the starting point. That sequence of movement is as follows:
A. Start at the bottom right cone.
B. Shuffle to the left to cone two.
C. Sprint forward to cone three.
D. Shuffle to the right to cone four.
E. Backpedal to cone one.
F. Sprint back to cone four.
G. Shuffle to the left to cone three.
H. Backpedal to cone two.
I. Shuffle to the right toward and past cone one to finish.
The stopwatch begins with the initial movement and ends when the athlete passes cone one on the return.
The T-test is another commonly used speed and agility assessment. Four cones should be set in a T formation within a 10-yard square. The movement sequence is as follows:
A. Start at the cone at the base of the T.
B. Sprint to the middle cone (cone two).
C. Side shuffle to the left (to cone three).
D. Carioca (or sprint) all the way to the right (to cone four).
E. Side shuffle left to the middle cone (cone two).
F. Backpedal to and through cone one to finish.
The longest distance can be completed either as a carioca or a sprint, but that choice should be noted for consistency in future assessments. The stopwatch starts with the initial movement and stops when the athlete backpedals past the first cone.
Using performance assessments for strength, explosive strength, reactive strength, speed, and agility, a coach can develop an assessment strategy specific to the athlete’s sport to capture the best data. The coach will then use the information garnered from performance assessments to develop programming for all training cycles with the goal of improving each assessment over time.
Athletic Demands and Performance Assessments


Comments